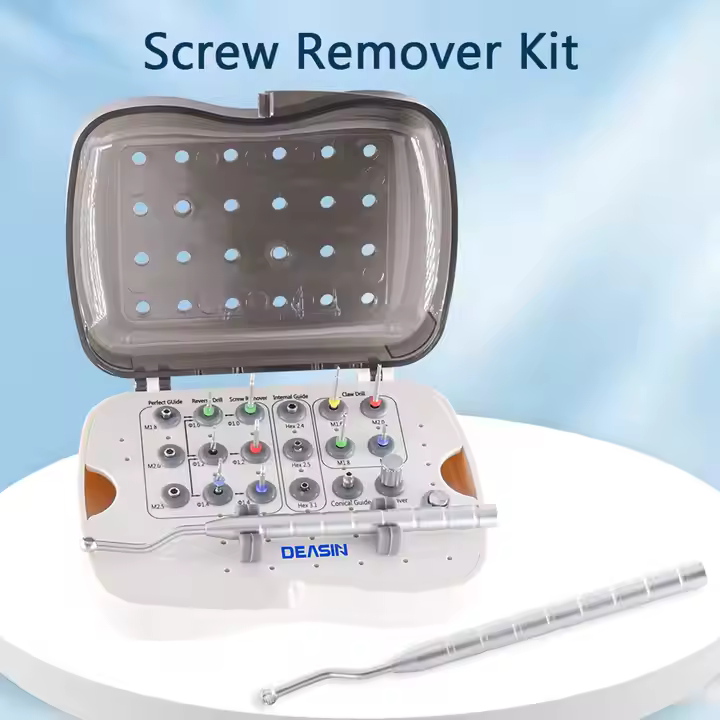

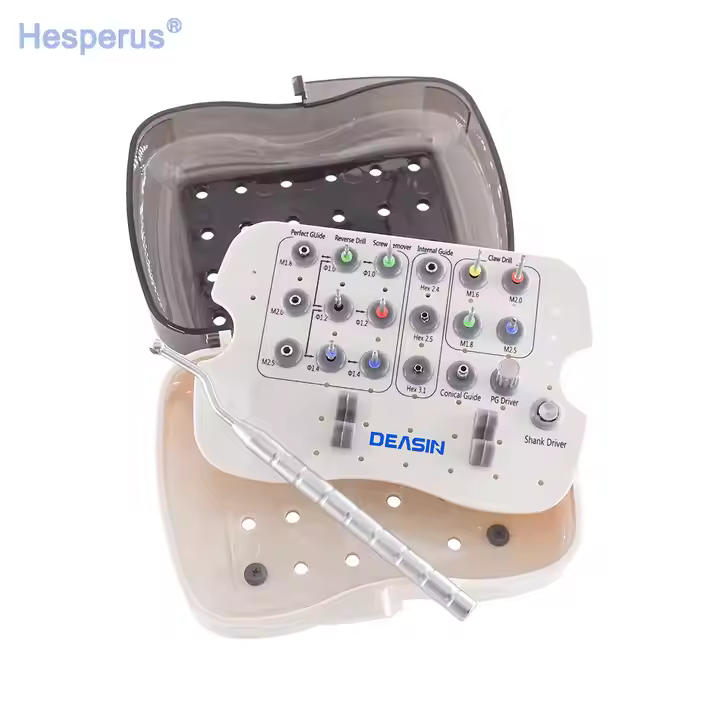
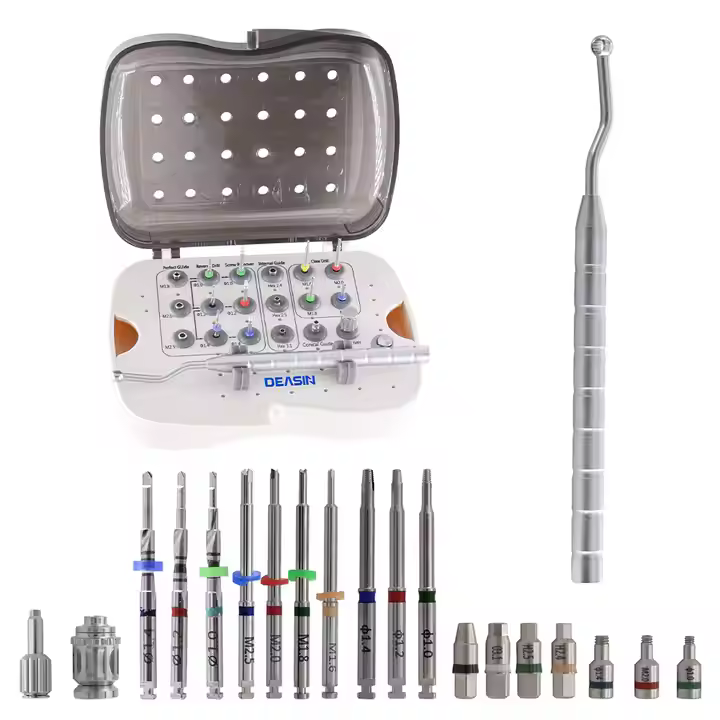
Description
Key attributes
Warranty
1 Year
After-sale Service
Online technical support
Instrument classification
Class I
Place of Origin
Guangdong, China
Brand Name
Deasin
Model Number
Implant Restoration Tools Kit
Power Source
Manual
Shelf Life
3 years
Quality Certification
ce
Packaging and delivery
Selling Units
Single item
Single package size
22X15X10 cm
Single gross weight
0.500 KG
Products Description
Title goes here.
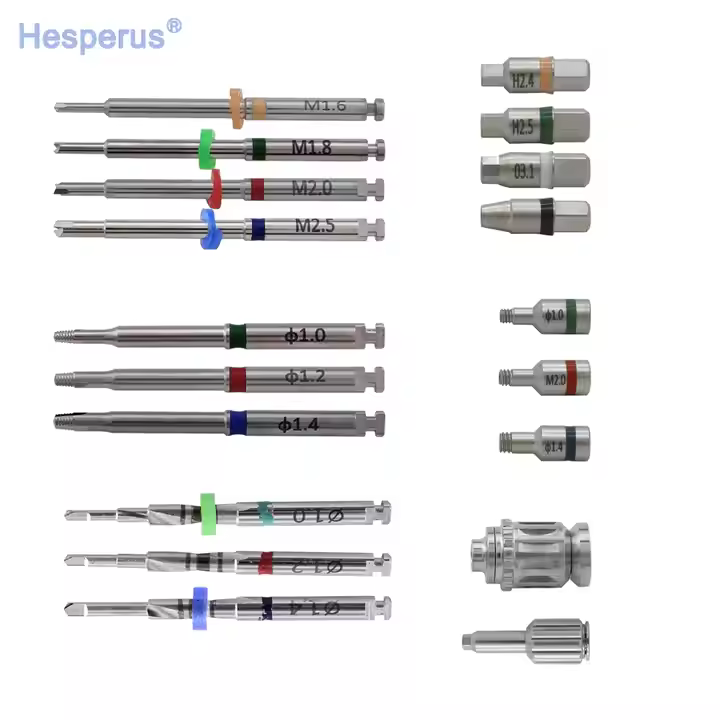
1. Claw
This is a surgical tool that removes a screw that has become fractured inside the Fixture. After selecting the size that is
appropriate for the size of the screw that is to be removed, it must be used by connecting a guide to the Fixture
(Conical/Internal/External Guide). Then it is connected to the Shank Driver, and the fractured screw can be removed by rotating by hand in the reverse direction. If the fractured screw cannot be removed using the Claw, it must be removed using the Reverse Drill and the Screw Remover.
|
Product Name
|
Fractured Screw size
|
Product Name
|
Fractured Screw size
|
|
CD16
|
M1.6
|
CD20
|
M2.0
|
|
CD18
|
M1.8
|
CD25
|
M2.5
|
2. Reverse Drill
* This is a tool that creates a hole on the fractured face of the Screw that will be used by the Screw Remover.
* After selecting the appropriate Reverse Drill for the size of the screw that needs to be removed, it must be used by connecting
a guide for the fi xture (Perfect/ Conical/Internal/External Guide). The depth of the drill can be adjusted from 1 mm to 3 mm,
because the Drill body has markings.
* The removal of an M1.6 size Screw Should utilize the Claw.
* Although diff erent manufacturers produce diff erent sizes of abutment screws, except in rare cases, typically they utilize
screws of Size M1.6, M1.8, M2.0, or M2.5.(‘M’ stands for a metric screw. The number indicates the external size of the screw.
For example, “M1.6 Screw” indicates that it is a metric screw the external diameter of which is 1.6 mm).
|
RCD10
|
Ø 1.0
|
M1.8
|
|
RCD12
|
Ø 1.2
|
M1.8
|
|
RCD14
|
Ø 1.4
|
M1.8
|
3. Screw Remover
* This is a device that removes a fractured screw. Insert a Screw Remover that is appropriate for the size of the hole that has been formed using the Reverse Drill and rotate at a low speed (at or below 80 rpm) in the reverse direction.
* The Screw Remover was designed in a tapered shape so as to increase, as it turns, the amount of friction, which is necessary to loosen the Screw.
|
Product Name
|
Diameter (Ø)
|
Fractured Screw size
|
|
SR10
|
Ø 1.0
|
M1.8
|
|
SR12
|
Ø 1.2
|
M2.0
|
|
SR14
|
Ø 1.4
|
M2.5
|
4. Shank Driver
* This is a surgical tool that was designed to be connected to the Screw Remover to allow the use of the hand, Torque Wrench, or Ratchet.
* This is a surgical tool that was designed to be connected to the Screw Remover to allow the use of the hand, Torque Wrench, or Ratchet.
|
Product Name
|
Standard
|
Applicable Products
|
|
SHD00
|
for Hand or Ratchet
|
Screw Remover
(SR10, SR12, SR14) |
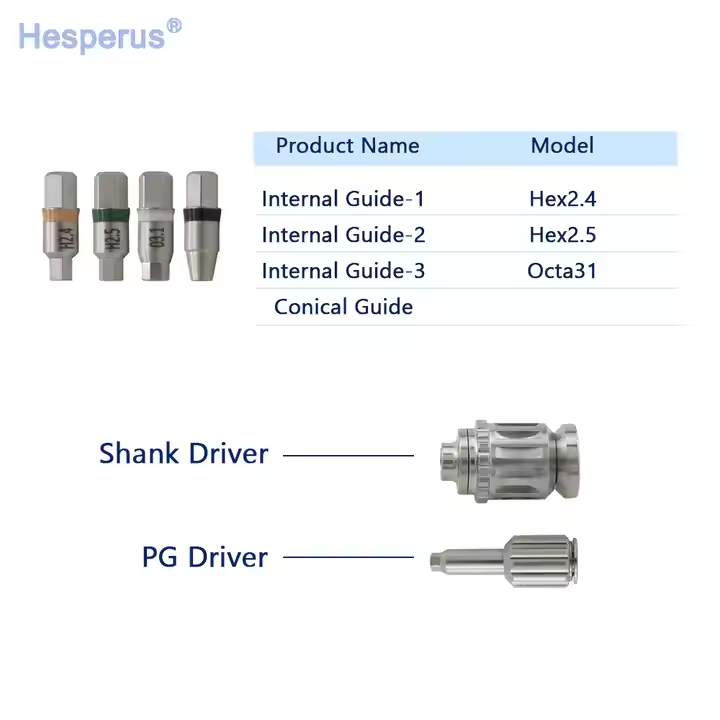
5. Perfect Guide & PG Hand Driver
* The Perfect Guide acts as a Guide for the Reverse Drill. It is used when the screw is fractured at the lower part of the female screw inside the Fixture. It is connected to PG Hand Driver and is directly applied to the Fixture female Screw.
* The Perfect Guide can be safely used because it has a stop structure inside that prevents the Reverse Drill from drilling more than 2mm.
6. Conical, Internal, External Guide
* They act as the Guide when using the Reverse Drill. They are used when the Perfect Guide cannot be used, or if the screw was fractured at a location deeper than 2mm into the lower part of the female screw inside the Fixture.
* The Guide appropriate for connecting to the Fixture must be selecte.
* They act as the Guide when using the Reverse Drill. They are used when the Perfect Guide cannot be used, or if the screw was fractured at a location deeper than 2mm into the lower part of the female screw inside the Fixture.
* The Guide appropriate for connecting to the Fixture must be selecte.
7. SR Driver Holder
* This can be easily affixed to the Fixture by connecting it to the 3.5 Double Hex part of the Conical, Internal, or External Guide.
* This can be easily affixed to the Fixture by connecting it to the 3.5 Double Hex part of the Conical, Internal, or External Guide.

Reviews
There are no reviews yet.